P0720: Output Speed Sensor Circuit Malfunction
Is your scanner showing P0720?
No worries. We'll show you what it means and how to deal with it.

P0720: Output Speed Sensor Circuit Malfunction
OVERVIEWWhat Does The P0720 Code Mean?
On electronically controlled transmissions, the Output Shaft Speed Sensor (OSS) is located on the end of the transmission before the drive axles or driveshaft to read the speed of the output shaft which may be used to determine shift scheduling, torque converter engagement schedule and Electronic Pressure Control (EPC) inside the transmission.
The Powertrain control module/Engine control module (PCM/ECM) has determined there is a malfunction with the OSS sensor. The PCM/ECM may substitute values based on other sensors to determine shift timing, torque converter operation and EPC pressure if the OSS sensor information is unavailable. The OSS sensor is also commonly used for the speedometer.
Note: On some vehicles, the OSS sensor is inline with the Transmission Fluid Temperature (TFT) sensor, if there is a failure with the TFT sensor or associated wiring, the OSS sensor may malfunction as well. If there is another code associated with the TFT sensor as well as the OSS sensor, suspect a possible problem with either sensor, or the wiring.
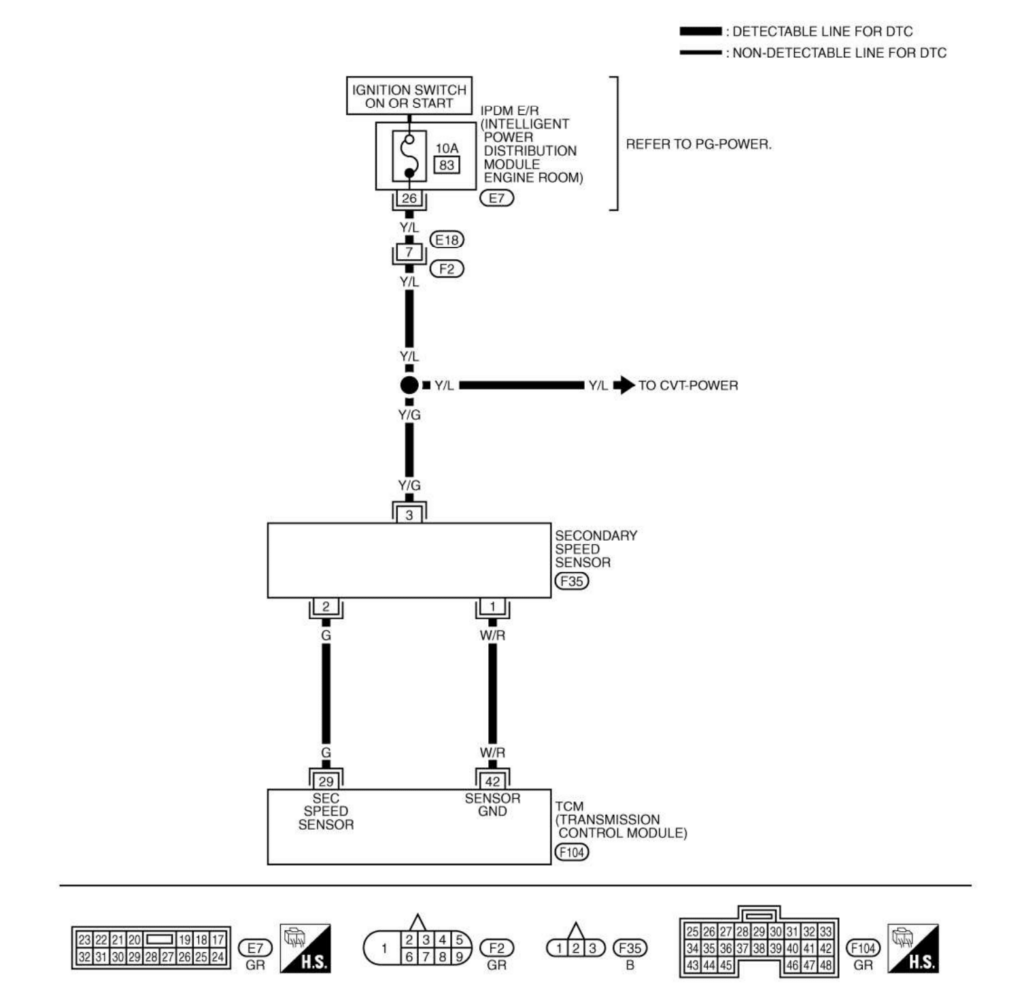
P0720 wiring diagram
This code is similar to codes P0721, P0722 and P0723
What Are The Symptoms Of The P0720 Code?
Symptoms of a P0720 trouble code may include:
- Delayed shifts
- Speedometer not working
- Check Engine Light illuminated (Malfunction Indicator Lamp)
What Are The Potential Causes Of The P0720 Code?
Causes of this DTC may include:
- Output shaft speed sensor
- Electrical wiring or connections
- Transmission fluid temperature sensor
How Can You Fix The P0720 Code?
Step 1
Output shaft speed sensor- The OSS sensor operates by passing an electrical current through the sensor, as the reluctor ring or gear on the end of the transmission output shaft rotates, the voltage changes in relation to the speed. This is usually displayed as a frequency or a voltage that corresponds to the speed of the shaft rotation.
Some vehicles use a plastic gear on the end of the OSS sensor. Remove the OSS sensor from the end of the transmission and check the condition of the gear to determine if the teeth are missing or worn and replace the gear if necessary. Check the wiring harness for any possible signs of damaged wiring, or loose connections.
Check the resistance of the OSS by removing the harness connector and using a Digital Volt Ohm Meter (DVOM) set to the ohms scale, with either lead on each of the terminal connectors. Resistance should be within specification determined by the factory shop manual.
Step 2
If the resistance is out of range or over limit (OL), replace the sensor. Check for power going into the sensor, and at the PCM harness connector using a factory wiring diagram as reference. If the OSS sensor is inline with the TFT sensor, the voltage will vary based on the temperature of the transmission fluid.
Using a graphing volt meter or oscilloscope set to the duty cycle scale with the positive lead on on the signal side of the sensor either after the sensor or at the PCM/ECM harness connector, and the negative lead to a known good ground. The duty cycle will only be displayed while the vehicle is in motion or the tires are spinning.
If the duty cycle has any dropouts in voltage or the voltage is out of the manufacturers specifications, suspect excessive resistance in the TFT sensor, wiring harness or the OSS sensor itself. If an advanced scan tool is available, the OSS sensor signal can also be monitored while driving the vehicle.
Step 3
Electrical wiring- Check the wiring harness for any loose connections, loose wiring, or dirty terminals. Unplug each of the harness connections from the vehicle wiring harness, output shaft speed sensor, TFT sensor if equipped and the PCM/ECM.
Using the the DVOM set to the ohms scale, with one lead on each end of the harness connectors using the factory wiring diagram as reference, check for excessive resistance. If resistance is very high, trace the wiring back through the circuit between each connector to determine the cause. If resistance indicates an over limit (OL) reading, look for any a broken or damaged wiring.
Check for a short to ground in the wiring harness sections by moving either the positive or negative lead to a known good ground.
The volt meter should indicate an OL reading, if there is resistance present, there may be a short to ground and the wiring harness should be checked for pinched or damaged wiring, or areas that could be rubbed through touching the vehicle chassis. Check for a short to power by switching the DVOM to the volts scale, with the positive lead on the wire being checked and the negative lead on a known good ground with the key in the run or on position.
No voltage should be present, if there is voltage present there may be a short to power – check the wiring harness for any pinched or damaged wires that may have come in contact with eachother.
Step 4
Transmission fluid temp sensor- On vehicles equipped with a TFT sensor in-line with the OSS sensor, the TFT sensor can be checked for resistance by using the DVOM set to the ohms scale. With the transmission wiring harness connector disconnected, using the factory wiring diagram as reference to locate the appropriate wires to the TFT sensor at the transmission side of the connector and the positive and negative lead to either of the two wires, the DVOM should be reading resistance within factory specifications.
If the reading is out of specifications or over limit (OL), replace the TFT sensor inside the transmission.
Check for a short to ground by moving either of the leads to a known good ground, the volt meter should be reading very high resistance or over limit (OL), if there is very little resistance found, suspect a short to ground, or a short inside the transmission internal wiring harness. Check the vehicle side of the transmission harness connector for power from the PCM/ECM using the factory wiring diagram as reference.
Set the DVOM to volts scale with the positive lead on the power supply wire from the PCM/ECM and the negative lead on a good known ground, the voltage reading should be battery voltage or 5 volts reference voltage.
If the voltage is ot of specifications, suspect a possible short to ground, faulty PCM/ECM, or a problem in the wiring between the transmission and the PCM/ECM.
Recommended Parts
Below are some recommended auto parts to help you address the trouble code affecting your vehicle and get it running smoothly again:


Note: During the purchasing process, please check carefully whether the part you want to buy fits your car!
Check This Video For Reference
Reference Sources
Diagnostic Trouble Code (DTC) Charts and Descriptions for P0720 – Page 102.