How to Read OBD1 Codes Like a Pro: 3 Easy DIY Methods
Are you the proud owner of a classic car from the mid-90s or earlier? If so, you’re probably no stranger to the occasional “hiccup” in your vehicle’s performance. Diagnosing the issue can be daunting, whether it’s a sudden drop in fuel efficiency or an inexplicable check engine light. That’s where OBD1 codes come in.
Reading OBD1 codes is a crucial first step in diagnosing any issues with your older vehicle. But did you know that with OBD1, you can read trouble codes at home without any diagnostic tools? That’s right – OBD1 makes it possible to diagnose potential emissions or engine performance issues using just a few simple tools and a bit of know-how.
This article will show you three easy DIY methods to read OBD1 codes like a pro. Let’s dive in.
Getting To Know OBD1 Codes
Before you start reading OBD1 codes, it’s important to understand what they are and how they work. OBD1 codes are alphanumeric codes corresponding to specific issues with your vehicle’s performance. Each code comprises two or three digits and may be accompanied by a letter.
However, it’s important to note that unlike OBD2 codes, OBD1 codes are not universal and can vary depending on the manufacturer and your vehicle’s specific make and model. For example, if you have a Honda Civic and a Ford Mustang, and both vehicles are experiencing an issue with the throttle position sensor, the OBD1 code for the problem would be different for each vehicle. On the Honda, the code for the problem would be 7, while on the Ford, it would be 63.
Therefore, it’s important to consult the appropriate repair manual to interpret them accurately. You can also find comprehensive lists of OBD1 codes for specific car models on our blog below:
- Honda OBD1 Codes List
- Ford OBD1 Codes List
- GM (Chevy, Buick, GMC, Cadillac) OBD1 Codes List
- Dodge/Chrysler OBD1 Codes List
- Jeep OBD1 Codes List
- Toyota OBD1 Codes List
Note: Some older vehicles may not be equipped with OBD1 systems at all.
Read more: OBDI vs. OBDII: The Evolution of Vehicle Diagnostics
How to Read OBD1 Codes Like a Pro: 3 Super Easy DIY Methods
There are several easy and cost-effective methods that you can use to retrieve these codes: use a jumper wire or a paper clip and scan the system with an OBD1 scanner.
These methods can be applied to any car equipped with an OBD1 system, including popular makes and models such as Buick, Cadillac, Chevrolet, GMC, Oldsmobile, and Pontiac from the 1980s and 1990s, as well as Honda, Ford, Dodge, Jeep, Chrysler, and many others.
Method 1 (Without A Diagnostic Tool): Using a Test Light and a Jumper
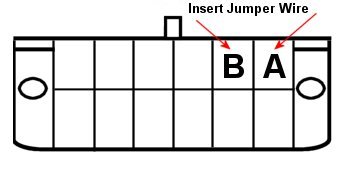
The principle of reading the OBD1 codes without a diagnostic tool is to shorten the circuit of pin A and pin B in the car’s OBD1 diagnostic port. This will cause the car to enter the diagnostic mode and flash the “check engine light” several times. By counting the number of flashes, we can determine the diagnostic codes produced by the car.
One of the easiest methods for reading OBD1 codes without scanners is to use a test light with jumper wires. Here are the steps:
Step 1: Locate the diagnostic port under the dashboard of your car.
The OBD1 diagnostic port is typically located under the dashboard on the car’s driver’s side. The port may be covered by a plastic cover that needs removing to access the port.
Step 2: Insert the jumper wire into the diagnostic port.
Insert one end of the jumper wire into the terminal labeled “A” or “B” on the diagnostic port. Ensuring the jumper wire is securely inserted into the terminal is important.
Step 3: Turn the ignition key to the “ON” position.
Make sure that the ignition key is turned to the “ON” position, but do not start the engine. This will allow the car’s electronic systems to power up and communicate with the diagnostic port.
Step 4: Connect the test light to the jumper wire.
Connect one end of the test light to the other end of the jumper wire inserted into the diagnostic port. Connect the other end of the test light to a good ground point on the car, such as a metal bracket or unpainted screw.
Step 5: Count the number of test light flashes to determine the code.
Once the test light is connected, it will begin flashing to indicate the code. The flashes will be in a sequence, with a short pause between each sequence.
Count the number of flashes to determine the code. For example, if the test light flashes twice, pauses, and then flashes three more times, it indicates code 23.
The number of flashes corresponds to a specific code, which can be identified using a code chart specific to your vehicle.
Method 2 (Without A Diagnostic Tool): Using a Paper Clip
Using a paper clip to read OBD1 codes is similar to using a test light with jumper wires, as both involve shorting the circuit between pins A and B in the car’s OBD1 diagnostic port. However, using a paper clip is a simpler and cost-effective alternative. Here’s how to check OBD1 codes with paperclip:
Step 1: Locate the diagnostic port under the dashboard of your car.
Step 2: Straighten out a paper clip and insert one end of it into the terminal labeled “A” or “B” on the diagnostic port. Make sure it’s securely inserted.
Step 3: Turn the ignition key to the “ON” position.
Step 4: Count the number of times the check engine light blinks to determine the code.
Using a paper clip is a cost-effective alternative for those who do not have access to a test light or jumper wires.
Method 3: Using an OBD1 Scanner
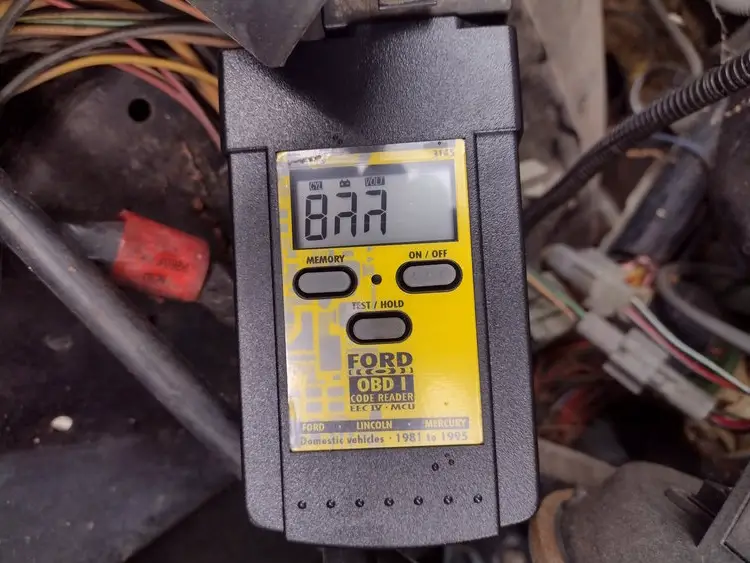
(Image credit: f150forum)
You can use an OBD1 scanner to read OBD1 codes if you want a more sophisticated approach. An OBD1 scanner is more efficient than using a paper clip or a test light with jumper wires because it eliminates the possibility of errors when manually counting the number of blinks from the Check Engine Light.
Here’s how to read your OBD1 codes using a scanner:
Step 1: Connect the OBD1 scanner to the diagnostic port under your car’s dashboard.
Step 2: Turn the ignition key to the “on” position.
Step 3: Follow the instructions on the scanner to read the codes.
Step 4: The scanner will display the codes. Write them down and look up their meanings using a reliable source to ensure the correct interpretation and appropriate repairs.
How To Reset OBD1 Codes?
After fixing the issue that caused the OBD1 codes, you may want to reset the codes and turn off the check engine light. There are several methods to reset OBD1 codes:
Method 1: Disconnect the jumper while it is blinking codes.
Method 2: Pull the fuse for 15-30 seconds to reset the ECU. Be careful not to accidentally remove the negative terminal of your battery.
Method 3: Take the negative battery cable off for a while. This method will also reset the ECU.
Resetting OBD1 codes is a simple process, but it’s important to fix the underlying issue first. If you reset the codes without resolving the issue, it may lead to further problems down the line.
Final Thoughts
Reading OBD1 codes is a critical part of maintaining and repairing your vehicle. By following these three easy DIY methods, you can diagnose and fix issues with your car like a pro. Remember to use the right method for your vehicle and consult a professional if you’re unsure about any aspect of the process.
For more information on car maintenance and repairs, check out the other articles in our OBD Knowledge series. Remember to share your tips and experiences with reading OBD1 codes in the comments below.
Reference Sources
To write this article, we consulted several reliable sources on how to check OBD1 codes as below:
- OBD-Codes, How to read GM 2-digit OBD codes for free.
- 2CarPros, Buick, Cadillac, Chevy, GMC, Oldsmobile, Pontiac, and GM – 1983 to 1995 OBD1 code definitions and retrieval method.
- Do Not DPF Delete, 2019, How to check OBD1 codes with a paperclip.
Leave a Reply